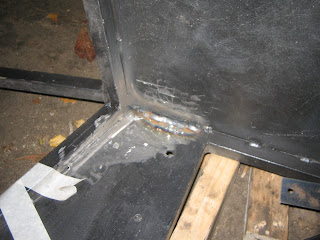
Finally I have been able to work on the car again.
I have done some small jobs last month. Like paint jobbies, and cutting the lower harness mounting strenthening plates. And yesterday I finally welded the plates to the chassis. Also, I have finally welded the steering rack mounts.
The seatbelt mounting plates should be fully welded to the chassis. Where the wheel arches will be, I had already welded a steel plate (1.6mm) to the chassis. To be able to weld the mounting plate to the chassis, I have removed the lower edge of the existing plate.
I have fully rewelded the new joint, and filled up the gap between the existing plate and the bottom plate.
Then I have put the triangular strengthening plate on top of that and fully welded all of it.
I still have to remove the welding spatter, clean up a bit.
Nice and painted!
Next jobs:
- strenthening the handbrake cable welded nuts,
- fitting seats, making the uppper harness mounting points,
- welding a roll-bar to the chassis.
Since I cannot bend the steel pipe myself and I have to source the correct material (at high cost), I decided to buy a complete roll-bar, ready to weld on the chassis. I expect it to arrive any day now.
Thursday, 27 November 2008
Tuesday, 28 October 2008
Final welding on rear axle
Yesterday I did the final welding on the rear axle. The panhard rod mounting and the handbrake cable brackets still needed to be fully welded. Also I have made a combined brace for the panhard rod mounting and the right handbrake cable bracket.
Note the additional brace against torsion on top of the bracket.
Before I could do the welding, I have removed the axle from the chassis. This had to be done anyway, because the chassis has also some items which must be fully welded. Therefore I need to flip the chassis over.
And I will refurbish the drum brakes on the axle at the same time.
Yep, that's me!
Wednesday, 22 October 2008
Handbrake 2: change of mind
I have changed my mind about solving the interference problem. It is a design problem and it should be taken care of asap. The longer I wait, the more problems will show up, for example in the interior trim.
I had a discussion with some blokes at www.locostbuilders.co.uk (great website!). I was given the tip to put the brackets for the outer cable behind the transmission tunnel instead of in the transmission tunnel. Because of the location and the fixed lenth of the inner cable, I will have to remake the handbrake cable adjuster. A small job, which I will tackle in a further stage, when the rear drum brakes on the Escort live axle are refurbished.
Modified routing. The cables run up and sideways. This shot is taken with axle in full bump situation.
Again at ride height.
At this time I have just tack-welded two M10 nuts onto the horizontal chassis member. When the axle has been removed in the near future, I will brace and fully weld the nuts.
On this picure can be seen what happens to the inner cable due to the angle at which it is coming in. I don't know what will happen to the inner cable when the handbrake is used.
This situation is not perfect, but still better compared to what is was.
Tuesday, 21 October 2008
Handbrake
The last days I have been working on the handbrake. I have given it many thoughts where to place the handle and how to have it pull the cables. I figured it will be in the way wherever I place it (on top of the transmission tunnel), so then I can better use it as an arm-rest for the longer trips.
The system does need a balance bar to equal the forces on both cables. Not to forget an adjustment system. The cables (Austin Allegro rear handbrake cables, part no. BC805) have approx 15mm thread on the end of the outer cable, which would give about 5mm of adjustment. Therefore I have made a new adjuster / balance bar. Total adjustment travel is approx 45mm.
All the items still need to be painted. I will put plastic bolts through the bigger part of the slotted holes, where the nipple of the inner cable is held, so the inner cable cannot come loose.
Bracket holding the outer cable. M10 nuts welded onto a piece of angle iron.
Handbrake system in situ.
A point of concern is the routing of the handbrake cable. In ride height it runs free. However with both wheels in full bump the cables interfere with the differential. I will leave this problem to be solved later on. I am thinking of som clips holding the cables. On the other hand: it will only be ocasionally that both wheels reach full bump. With one wheel in ride height and one wheel in full bump there is no interference.
This picture shows routing, with the axle in ride height.
Both wheels full bump!
Again, but with (improvised :) clip to hold the cables.
Tuesday, 14 October 2008
Handbrake cable brackets
As mentioned in an earlier post, it was quite a puzzle where and how to make the handbrake cable brackets. The problems were interference with the panhard rod and getting the correct pulling angle.
I ended up with a non symetrical solution. Right hand side: length of bracket approximately 11 cm (rear from axle). The end is twisted a few degrees to get the correct pulling angle. (Tack welded).
The left hand side is approximately 6 cm rear from the axle. Also this side is twisted. Both brackets have been made from angle iron 30x30x3mm.
Monday, 13 October 2008
Panhard Rod
Finally I made the panhard rod. The rod itself is 25x2mm seamless tube with a spherical bearing on one end and a metalistic bush on the other end. On one side I have welded in a threaded bush (M12) to mount the bearing (rose joint). The end has been welded and I have made 4 plug welds. To do so, in the rod I have drilled 7mm holes. Then I inserted the bush and welded up the holes. In this way the connection will be superstrong.
The other side is 'normal', fitted with a metalistic bush.
The 'rose jointed' end of the panhard rod. Although grinded smooth, you can still see the plug welds.
The right-hand side. Tack welded only. It was a bit of a puzzle how to route the handbrake cable.
An overview picture of the panhard rod. (The white spot on the diff seems to be the first snow in my workshop :))
Seats
Tuesday, 7 October 2008
Progress: Front suspension and steering rack
Here you can see what I am up to now.
Jig for welding suspension mounting brackets.
Trial fitting front suspension.
Shock absorber mounting bracket. Check my cool engine mounts.
Fitting steering rack (Escort Mk2). I made a jig to position the rack, clamp it down and check for bumpsteer. For checking this I attached a laser spirit level to the wheels. Then move the wheels and wishbones up and down along the travel of the wheel (from ride height, to max bump and max droop).
It was a puzzle how to get the steering column pass the alternator and the exhaust manifold. As you can see my car is a left hand drive.
This is gonna be OK.
The two steering rack mounts, seen from rear to front. I made them somewhat stiffer than in the book. The welding has not been finished yet.
Another view. As you can see I used 3mm steel plate which is bent 90 degrees for stiffness. Probably I will add a brace between the two mounts.
Next jobs: Making and fitting rollbar, panhard rod, seatbelt mountings
History
WHY THUNDER ROAD SUPER SEVEN?
I came up with this name, because we have moved house in the summer of 2007. The name of the street is free translated: Thunderroad.
WHY BUILD A SUPER SEVEN?
I had a Renault 5 GT Turbo at that time, and got enthousiastic about fast cars. Next to the 5 I wanted something special. As I was still a student (Bsc. Mechanical Engineering), I did not even have a dime to scratch my ars. Well, not enough dimes to buy me a decent sportscar. When I got to know about 'the book' (How to build your own sportcar for as little as 250 pounds) I ordered it via internet and started. I knew in beforehand it was going to be a long run. There are other thing in my life which have priority, but sometimes I have difficulties to put down the angle grinder and the welding torch. Now, after 6 (!) years of buiding (on and off), I have a rolling chassis. I am very motivated to complete the project within 1 or 2 years.
UNTIL NOW:
I started with a Ford Escort Mk1, 1974. I stripped it and got rid of the chassis.
I started the fabrication of the spaceframe september 2002.
Spring 2003.
Summer 2003. I got myself a cool welding machine! Chassis fully welded. Note that most brackets and mounts are still missing. I still had to fit the engine, make the wishbones etc.
After finding we were expecting a baby by October 2003 we were moving to a bit bigger house. WITH A BIG GARAGE! :))) A lot of time is taken by the baby and by building and renovating the house. A continuous job. When there was nothing urgent to do, I took the time to work on the chassis.
Fall 2005! Only 2,5 years after last picture. Cleaning and painting the chassis. Cleaning has been done with an angle grinder and steel brush and with sandpaper discs. Note the 'baby' on the background. He has grown to little boy.
In the next period of time I have made the engine mounts, gearbox mount and steel bottom plate.
Again, in summer 2007 we have moved to another house. This time a farm house from 1912. It was in a very bad shape. A lot of spare time went into the house. Spare time was getting rare because of two beautiful children and a beautiful wife, working in health care.
Finally somewhere in spring 2008 the top-priority repairs and rebuilds were taken care of, and work on the 7 could continue. First job: suspension.
I am working on the house and the 7 in the same time. I like working on the house as well, but sometimes I feel that there is not enough progress on the 7.
FROM HERE ON, YOU CAN READ IN THE NEXT POSTS.
And also, some other pictures:
Children (picture 2007) ...
... and wife.
And the old farm house.
I came up with this name, because we have moved house in the summer of 2007. The name of the street is free translated: Thunderroad.
WHY BUILD A SUPER SEVEN?
I had a Renault 5 GT Turbo at that time, and got enthousiastic about fast cars. Next to the 5 I wanted something special. As I was still a student (Bsc. Mechanical Engineering), I did not even have a dime to scratch my ars. Well, not enough dimes to buy me a decent sportscar. When I got to know about 'the book' (How to build your own sportcar for as little as 250 pounds) I ordered it via internet and started. I knew in beforehand it was going to be a long run. There are other thing in my life which have priority, but sometimes I have difficulties to put down the angle grinder and the welding torch. Now, after 6 (!) years of buiding (on and off), I have a rolling chassis. I am very motivated to complete the project within 1 or 2 years.
UNTIL NOW:
I started with a Ford Escort Mk1, 1974. I stripped it and got rid of the chassis.
I started the fabrication of the spaceframe september 2002.
Spring 2003.
Summer 2003. I got myself a cool welding machine! Chassis fully welded. Note that most brackets and mounts are still missing. I still had to fit the engine, make the wishbones etc.
After finding we were expecting a baby by October 2003 we were moving to a bit bigger house. WITH A BIG GARAGE! :))) A lot of time is taken by the baby and by building and renovating the house. A continuous job. When there was nothing urgent to do, I took the time to work on the chassis.
Fall 2005! Only 2,5 years after last picture. Cleaning and painting the chassis. Cleaning has been done with an angle grinder and steel brush and with sandpaper discs. Note the 'baby' on the background. He has grown to little boy.
In the next period of time I have made the engine mounts, gearbox mount and steel bottom plate.
Again, in summer 2007 we have moved to another house. This time a farm house from 1912. It was in a very bad shape. A lot of spare time went into the house. Spare time was getting rare because of two beautiful children and a beautiful wife, working in health care.
Finally somewhere in spring 2008 the top-priority repairs and rebuilds were taken care of, and work on the 7 could continue. First job: suspension.
I am working on the house and the 7 in the same time. I like working on the house as well, but sometimes I feel that there is not enough progress on the 7.
FROM HERE ON, YOU CAN READ IN THE NEXT POSTS.
And also, some other pictures:
Children (picture 2007) ...
... and wife.
And the old farm house.
Monday, 19 May 2008
Start
This is my first post. I will post progress reports on the build of my SUPER SEVEN. (If I can keep up with the incredible speed at which I am building :) The goal and motivation can be seen in the picture. Still a loooong way to go.
Inspiration of this project comes from 'the book': 'How to build your own sportscar for as little as 250 pounds, and race it!'.
Start of the project:september 2002. This project will take a long time. Later on I will post about the start and the progress so far. At this time my chassis is almost rolling.
HAPPY READING!
Dit is het eerste blogbericht. Hier ga ik de bouw van mijn SUPER SEVEN Bijhouden. De doelstelling is ongeveer als op deze foto. Maar dat is nog lang niet zover.
De inspiratie komt uit 'het boek': 'How to build your own sportscar for as little as 250 pounds, and race it!'.
Start project: september 2001. Een meerjaren planning dus. Later zal ik meer schrijven over de start en over het bouwproces tot nu toe. Op dit moment heb ik bijna een rollend chassis.
Tot later!
Subscribe to:
Posts (Atom)