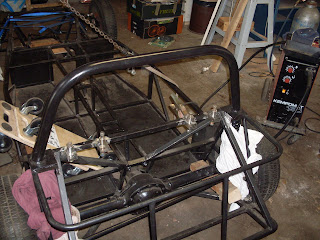
I knew in beforehand that it would not fit, but still I could not resist trial fitting the Zetec and mt75 gearbox. I forgot that it would not be possible to lower the engine and gearbox mounten together.
Tight fit but probably possible without modifying the transmission tunnel. (Tunnel was designed for Escort Mk1 4-speed gearbox).
The oil filter needs to be removed and replaced by a smaller version. The engine supports (made for a Crossflow engine) have to be cut, as well as the main diagonal strengtening beam. After fitting the engine new diagonals will be added.
Thursday 18 June 2009
Monday 18 May 2009
Engine liberated!
Yesterday I have liberated the engine form the Mondeo. I have disconnected all the electrics, the hoses etc. Then I cut the propshafts with an angle grinder. Removed the forward and aft gearbox supports, so the engine and gearbox were supported in 2 supports only.
I could lift the engine and gearbox out very easily.
Note that I have labelled all the connectors from the wiring loom.
The Sierra mt-75 gearbox fits directly to the 1.8 Zetec engine.
I could lift the engine and gearbox out very easily.
Note that I have labelled all the connectors from the wiring loom.
The Sierra mt-75 gearbox fits directly to the 1.8 Zetec engine.
Sunday 3 May 2009
Mondeo donor car
Due to regulations in Holland I am forced to use another engine. Not the 1.6 Kent which had already been fitted. Fuel injection, labda and catalitic converter must be used. I have chosen to use a Ford zetec engine, because it can easily be fitted to a Ford RWD gearbox. Enter the Ford Mondeo donor vehicle!
Friday 17 April 2009
Fuel tank - Triumph Spitfire
Yes, I got a fuel tank for a bargain, € 10,- only. A small hole needs to be repaired at the filler neck. It does need some inside cleaning (rust) and an electric fuel pump for the injection engine. I will wait with modifications until I have the needed parts.
After some trimming with an angle grinder and some persuasion with a hammer it fits perfectly in the boot of the car. This will save time and money from making my own.
Roll-bar stays and fuel tank supports
For the roll-bar stays I have made a piece to divert the forces in case of an accident. The piece is made from angle iron 50 x 50 x 5 mm and it is fully welded onto the lower part of the chassis. This will provide ample strength. The back-stays are made to snugly fit onto the upper roll-bar and onto the load dividing piece.
Friday 3 April 2009
Upper harness mounts
I have been working on the upper harness mounts some time now. The height of the mounts is very important. The minimum required height for SVA/IVA is 450mm above the seat reference point. This is exactly the height of the rear member where the mount are to be welded on. However, with the seats placed and the harness fitted, the harness seems to point upwards about 45 degrees. In case of a head on colission this can cause compression injuries to the spine. Also, it seams that for smaller people the harness interferes with the edge of the harness slot in the seat. Therefore I chose to raise the mount by 25mm.
Tuesday 17 March 2009
Placing the seats
In order to place the seats I have screwed in threaded bar, extending 20 mm from the under side of the seats (the spacers for mounting will be 20 mm high).
Then I placed cardboard on the bottom of the car.
I gently placed the seats onto the cardboard. When happy with the location I pushed the seats down, so the threaded bar left a mark on the cardboard. The dog approved this method of working...
I have drilled 9 mm holes on the marks. The seats fitted perfectly!
Subscribe to:
Posts (Atom)